Web scraping 기초 문법
웹 크롤링의 기초개념
웹 크롤링 vs 웹 스크래핑
- 웹 크롤러(Web Crawler) : 웹 사이트에 있는 수많은 정보 가운데 우리가 원하는 정보를 수집하는 프로그램
- 웹 크롤링(Web Crawling) : 웹 크롤러를 이용해 데이터를 수집하는 행위
- 웹 스크래핑(Web Scraping) : 웹 사이트에서 원하는 정보를 추출하는 것은 웹 크롤링과 동일함. 그러나 전체 사이트의 데이터가 아닌 원하는 정보 일부만을 추출
웹 크롤링 프로세스
from IPython.display import Image
Image('./web crawling.png', width=600)

- 정보를 얻고하 하는 웹 사이트에 접속해 웹 페이지를 확인
- 키보드의 F12 키 또는 개발자 도구로 들어가 원하는 정보의 위치를 확인하고 분석
- 파이썬 코드를 작성해 접속한 웹 페이지의 html 코드를 불러옴
- 불러온 데이터에서 원하는 정보를 가공한 후 추출
- 추출한 정보를 csv나 데이터베이스 등 다양한 형재로 저장하거나 가공하고 시각화
클라이언트 서버 개념
from IPython.display import Image
Image('./serverclient.png', width=600)

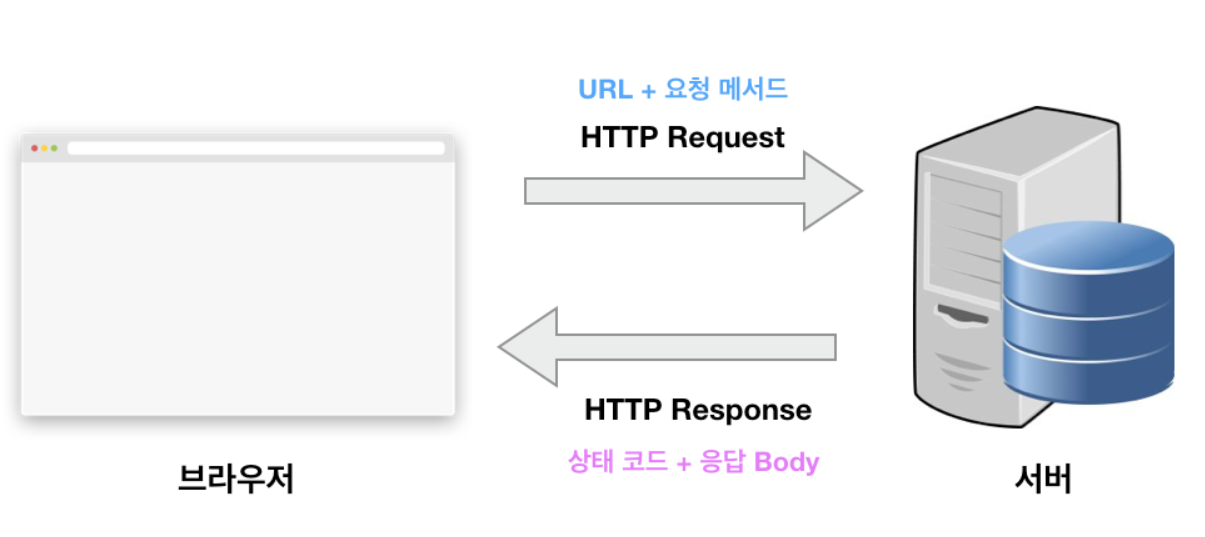
HTTP 통신의 이해
from IPython.display import Image
Image('./http.png', width=600)
웹 페이지의 구성 요소들
참고 사이트 : https://www.w3schools.com/
1. HTML
- 웹페이지의 뼈대
practice.html
<!doctype html>
<html>
    <head>
        <meta charset="UTF-8">
        <title> 기초 스크레이핑 </title>
    </head>
    <body>
        스크레이핑을 해봅시다
    </body>
</html>
<!doctype html> : 문서타입이 HTML 문서라는 의미
<html> : HTML 문서의 시작과 끝을 의미, 작성하고자 하는 모든 웹 문서는 <html> 태그 사이에 있어야 함
<head> : 웹브라우저가 문서를 해석하는데 필요한 정보들을 입력하는 곳
<title> : 웹브라우저의 제목 표시줄에 표시
<body> : 웹페이지에서 보게 될 주요 정보들
속성추가
<img> 태그의 경우는 속성을 추가해서 이미지의 가로길이, 세로길이 등으로 이미지의 크기를 조정할 수 있음
<img src="./image/image01.jpg", width="200", height="100">

<a> 태그의 경우도 연결할 링크 정보 등을 넣을 수 있음
<a href="http://google.com">Google </a>
종료 태그가 없는 태그들
<br>, <img>, <link>, <input>
자주 사용하는 HTML 태그들
<h1> 제목 </h1> : 큰 폰트 사용
<p> 문단 </p> : 줄바꿈없는 한 문단
<li> 목록 </li> : 목록 만들 때 사용
<table> 표 </table>
<tr>, <td>, <th> : 표 만들 때 사용
<div> </div> : 레이아웃 구분할 때 사용. 블록 단위 부분 공간 정의
<span></span> : 레이아웃 구분할 때 사용. 줄 단위 부분 공간 정의
html의 계층 구조
- Tree 형태의 부모 자식 관계로 이해
2. CSS
- 문서의 스타일을 꾸며주는 기능
(1) 인라인 스타일
practice_css1.html
<!DOCTYPE html>
<html lang="ko">
<head>
  <meta charset="UTF-8">
  <title>상품 소개 페이지</title>
</head>
<body>
  <h1>레드향</h1>
  <p style="color:blue;">껍질에 붉은 빛이 돌아 레드향이라 불린다.</p>
  <p>레드향은 한라봉과 귤을 교배한 것으로 일반 귤보다 2~3배 크고, 과육이 붉고 통통하다.</p>
  <p>비타민 C와 비타민 P가 풍부해 혈액순환, 감기예방 등에 좋은 것으로 알려져 있다.</p>
</body>
</html>
practice_css1.html 코드 설명
: 웹 페이지의 특정 요소가 <p> 태그를 사용할 때, <p> 태그의 텍스트 색상을 모두 파란색으로 지정
(2) 내부 스타일 시트
practice_css2.html
<!DOCTYPE html>
<html lang="ko">
<head>
  <meta charset="UTF-8">
  <title>상품 소개 페이지</title>
  <style>
    h1 {
      color:red;
    }
  </style>
</head>
<body>
  <h1>레드향</h1>
  <p>껍질에 붉은 빛이 돌아 레드향이라 불린다.</p>
  <p>레드향은 한라봉과 귤을 교배한 것으로 일반 귤보다 2~3배 크고, 과육이 붉고 통통하다.</p>
  <p>비타민 C와 비타민 P가 풍부해 혈액순환, 감기예방 등에 좋은 것으로 알려져 있다.</p>
</body>
</html>
practice_css2.html 코드 설명
: 웹 페이지의 특정 요소가 <h1> 태그를 사용할 때, <h1> 태그의 텍스트 색상을 모두 빨간색으로 지정
(3) 외부 스타일 시트
practice_css3.html
<!DOCTYPE html>
<html lang="ko">
<head>
  <meta charset="UTF-8">
  <title>상품 소개 페이지</title>
  <link rel="stylesheet" href="css/style.css">
</head>
<body>
  <h1>레드향</h1>
  <p>껍질에 붉은 빛이 돌아 레드향이라 불린다.</p>
  <p>레드향은 한라봉과 귤을 교배한 것으로 일반 귤보다 2~3배 크고, 과육이 붉고 통통하다.</p>
  <p>비타민 C와 비타민 P가 풍부해 혈액순환, 감기예방 등에 좋은 것으로 알려져 있다.</p>
</body>
</html>
practice_css3.html 코드 설명
<link> : 외부 파일 읽을 수 있음
         href 속성을 이용하여 경로 입력
         rel 속성은 외부 리소스의 종류로 css 파일과 같이 스타일 시트를 적용할 때는 "stylesheet"

<h1> : 외부 css 파일에서 설정한 디자인 스타일이 적용 (예: 빨간색으로 변경)
css/style.css
h1 {
  color:red;
}
위 css 코드의 의미
: 웹 페이지의 특정 요소가 <h1> 태그를 사용할 때, <h1> 태그의 텍스트 색샹을 모두 빨간색으로 지정
CSS 선택자
(1) 전체 선택자
- 페이지에 있는 모든 요소를 대상으로 스타일을 적용할 때 사용
- 웹 브라우저의 기본 스타일을 초기화할 때 자주 사용
css_selector1.html
<!DOCTYPE html>
<html lang="ko">
<head>
  <meta charset="UTF-8">
  <title>상품 소개 페이지</title>
  <style>
    * {
      margin:0;
    }
  </style>
</head>
<body>
  <img src="image/movie_4.jpg">
</body>
</html>
(2) 타입 선택자
- 문서에서 특정 태그를 사용한 모든 요소에 스타일이 적용됨
css_selector2.html
<!DOCTYPE html>
<html lang="ko">
<head>
  <meta charset="UTF-8">
  <title>상품 소개 페이지</title>
  <style>
    p {
      font-style: italic;
    }
  </style>
</head>
<body>
  <div>
    <h1>레드향</h1>
    <p>껍질에 붉은 빛이 돌아 레드향이라 불린다.</p>
    <p>레드향은 한라봉과 귤을 교배한 것으로 일반 귤보다 2~3배 크고, 과육이 붉고 통통하다.</p>
    <p>비타민 C와 비타민 P가 풍부해 혈액순환, 감기예방 등에 좋은 것으로 알려져 있다.</p>
  </div>
</body>
</html>
(3) class 선택자
- 요소의 특정 부분에만 스타일 적용
- 마침표(.) 다음에 클래스 이름 지정
- 문서 안에서 여러 번 반복할 스타일이라면 클래스 선택자로 정의
css_selector3.html
<!DOCTYPE html>
<html lang="ko">
<head>
  <meta charset="UTF-8">
  <title>상품 소개 페이지</title>
  <style>
    p {
      font-style: italic;  /* 이탤릭체 */
    }
    .accent {
      border:1px solid #000;  /* 테두리 */
      padding:5px;  /* 테두리와 내용 사이의 여백 */
    }
    .bg {
      background-color:#ddd;    /* 배경색 */
    }
  </style>
</head>
<body>
  <div>
    <h1 class="accent bg">레드향</h1>
    <p>껍질에 붉은 빛이 돌아 <span class="accent">레드향</span>이라 불린다.</p>
    <p>레드향은 한라봉과 귤을 교배한 것으로 일반 귤보다 2~3배 크고, 과육이 붉고 통통하다.</p>
    <p>비타민 C와 비타민 P가 풍부해 혈액순환, 감기예방 등에 좋은 것으로 알려져 있다.</p>
  </div>
</body>
</html>
(4) id 선택자
- 요소의 특정 부분에만 스타일 적용
- 파운드(#) 다음에 id 이름 지정
- 문서 안에서 한번만 사용한다면 id 선택자로 정의
css_selector4.html
<!DOCTYPE html>
<html lang="ko">
<head>
  <meta charset="UTF-8">
  <title>상품 소개 페이지</title>
  <style>
    #container {
      width: 500px;  /* 너비 */
      margin: 10px auto;  /* 바깥 여백 */
      padding: 10px;  /* 테두리와 내용 사이 여백 */
      border: 1px solid #000;  /* 테두리 */
    }
  </style>
</head>
<body>
  <div id="container">
    <h1>레드향</h1>
    <p>껍질에 붉은 빛이 돌아 레드향이라 불린다.</p>
    <p>레드향은 한라봉과 귤을 교배한 것으로 일반 귤보다 2~3배 크고, 과육이 붉고 통통하다.</p>
    <p>비타민 C와 비타민 P가 풍부해 혈액순환, 감기예방 등에 좋은 것으로 알려져 있다.</p>
  </div>
</body>
</html>
(5) 그룹 선택자
- 같은 스타일을 사용하는 선택자를 한꺼번에 정의
- 쉼표(,)로 구분해 여러 선택자를 나열
css_selector5.html
<!DOCTYPE html>
<html lang="ko">
<head>
  <meta charset="UTF-8">
  <title>상품 소개 페이지</title>
  <style>
    /*
    h1 {
      text-align:center;
    }
    p {
      text-align:center;
    }
    */
    h1, p {
      text-align: center;
    }
  </style>
</head>
<body>
  <div>
    <h1>레드향</h1>
    <p>껍질에 붉은 빛이 돌아 <span class="accent">레드향</span>이라 불린다.</p>
    <p>레드향은 한라봉과 귤을 교배한 것으로 일반 귤보다 2~3배 크고, 과육이 붉고 통통하다.</p>
    <p>비타민 C와 비타민 P가 풍부해 혈액순환, 감기예방 등에 좋은 것으로 알려져 있다.</p>
  </div>
</body>
</html>
3. JavaScript
- 컨텐츠를 동적으로 바꾸는 기능
(1)웹 요소를 제어
- 웹 요소를 가져와서 필요에 따라 스타일을 변경하거나 움직이게 할 수 있음
- 웹 사이트 UI 부분에 많이 활용
- 예) 마우스 포인터를 올렸을 때 펼쳐지는 메뉴 한 화면에서 탭을 눌러 내용만 바뀌도록 하는 콘텐츠
(2)다양한 라이브러리를 사용할 수 있음
- 웹을 중심으로 하는 서비스가 늘어나면서 브라우저에서 처리해야 할 일이 늘어남 라이브러리와 프레임워크가 계속 등장
- 예) 시각화를 위한 d3.js, 머신러닝을 위한 tensorflow.js DOM 조작을 위한 jQuery 등
- 예) 웹 애플리케이션 개발을 위한 React, Angular, Vue 등
(3)웹 애플리케이션 제작
- 최근의 웹 사이트는 사용자와 실시간으로 정보를 주고 받으며 애플리케이션처럼 동작
- 예) 온라인 지도의 길찾기 서비스, 데이터 시각화 서비스 공개된 API를 활용한 다양한 서비스
(4)서버를 구성하고 서버용 프로그램을 만들 수 있음
- node.js : 프런트엔드 개발에 사용하던 자바스크립트를 백엔드 개발에서 사용할 수 있게 만든 프레임워크
웹 문서 안에 자바스크립트 작성하기
script1.html
<!DOCTYPE html>
<html lang="ko">
<head>
	<meta charset="UTF-8">
	<meta name="viewport" content="width=device-width, initial-scale=1.0">
	<title>글자색 바꾸기</title>
	<style>
		body { text-align:center; }
		#heading { color:blue; }
		#text {
			color:gray;
			font-size:15px;
		}
	</style>
</head>
<body>
	<h1 id="heading">자바스크립트</h1>
	<p id="text">위 텍스트를 클릭해 보세요</p>

	<script>
		var heading = document.querySelector('#heading');
		heading.onclick = function() {
			heading.style.color = "red";
		}
	</script>
</body>
</html>
외부 스크립트 파일 연결해서 작성하기
script2.html
<!DOCTYPE html>
<html lang="ko">
<head>
	<meta charset="UTF-8">
	<meta name="viewport" content="width=device-width, initial-scale=1.0">
	<title>글자색 바꾸기</title>
	<style>
		body { text-align:center; }
		#heading { color:blue; }
		#text {
			color:gray;
			font-size:15px;
		}
	</style>
</head>
<body>
	<h1 id="heading">자바스크립트</h1>
	<p id="text">위 텍스트를 클릭해 보세요</p>

	<script src="js/change-color.js"></script>
</body>
</html>
js/change-color.js
var heading = document.querySelector('#heading');
heading.onclick = function() {
	heading.style.color = "red";
}
BeautifulSoup 라이브러리
- 스크래핑 하는 데 필요한 함수를 한 데 모아 놓은 라이브러리
from bs4 import BeautifulSoup
실습 1
# 파싱할 대상 문서
html_doc = """
<!doctype html>
<html>
    <head>
        <title> 기초 스크레이핑 </title>
    </head>
    <body>
        스크레이핑을 해봅시다
    </body>
</html>
"""
# 문서를 해석(interpret) -> 파싱
# BeautifulSoup(파싱할 대상 문서, 구문분석할 엔진)
# BeautifulSoup() 이용해서 주어진 문서를 파싱한 후 생성된 객체를 soup 변수에 담기
soup = BeautifulSoup(html_doc, 'lxml') # 구문분석 엔진 : html.parser, lxml...
type(soup)
bs4.BeautifulSoup
soup
<!DOCTYPE html>
<html>
<head>
<title> 기초 스크레이핑 </title>
</head>
<body>
        스크레이핑을 해봅시다
    </body>
</html>
print(soup.prettify())
<!DOCTYPE html>
<html>
 <head>
  <title>
   기초 스크레이핑
  </title>
 </head>
 <body>
  스크레이핑을 해봅시다
 </body>
</html>
# soup.find(태그명)
soup.find('title')
<title> 기초 스크레이핑 </title>
soup.find('head')
<head>
<title> 기초 스크레이핑 </title>
</head>
실습 2
# 파싱할 대상 문서
html_doc = """
<!doctype html>
<html>
    <head>
        <title> 기초 스크레이핑 </title>
    </head>
    <body>
        <li> 첫번째 목록</li>
        <li> 두번째 목록</li>
        <li> 세번째 목록</li>
    </body>
</html>
"""
soup = BeautifulSoup(html_doc, 'lxml')
li = soup.find('li')
print(type(li))
li
<class 'bs4.element.Tag'>


<li> 첫번째 목록</li>
lis = soup.find_all('li')
print(type(lis))
lis
<class 'bs4.element.ResultSet'>


[<li> 첫번째 목록</li>, <li> 두번째 목록</li>, <li> 세번째 목록</li>]
lis[0] # ResultSet에서 색인하면 개별 li tag를 반환
<li> 첫번째 목록</li>
lis[1]
<li> 두번째 목록</li>
for li in lis:
  print(li)
<li> 첫번째 목록</li>
<li> 두번째 목록</li>
<li> 세번째 목록</li>
for li in lis:
  print(li.text)
 첫번째 목록
 두번째 목록
 세번째 목록
실습 3
html_doc = '''
<!doctype html>
<html>
    <head>
        <title>기초 스크레이핑</title>
    </head>
    <body>
        <table border="1">
            <caption> 과일 가격과 개수 </caption>
            <tr>
                <th> 상품 </th>
                <th> 가격 </th>
                <th> 개수 </th>

            </tr>
            <tr>
                <td> 오렌지 </td>
                <td> 100원 </td>
                <td> 10개 </td>
            </tr>
            <tr>
                <td> 사과 </td>
                <td> 150 </td>
                <td> 5개 </td>
            </tr>
        </table>
        <br>
        <br>
         <table border="2">
            <caption> 옷 가격과 개수 </caption>
            <tr>
                <th> 상품 </th>
                <th> 가격 </th>
                <th> 개수 </th>

            </tr>
            <tr>
                <td> 셔츠 </td>
                <td> 30000원 </td>
                <td> 2개 </td>
            </tr>
            <tr>
                <td> 바지 </td>
                <td> 20000원</td>
                <td> 1개 </td>
            </tr>
        </table>

    </body>

</html>
'''
soup = BeautifulSoup(html_doc, 'lxml')
# 두번째 테이블만 가져오기(option 1)
tables = soup.find_all('table')
tables[1]
<table border="2">
<caption> 옷 가격과 개수 </caption>
<tr>
<th> 상품 </th>
<th> 가격 </th>
<th> 개수 </th>
</tr>
<tr>
<td> 셔츠 </td>
<td> 30000원 </td>
<td> 2개 </td>
</tr>
<tr>
<td> 바지 </td>
<td> 20000원</td>
<td> 1개 </td>
</tr>
</table>
# 두번째 테이블만 가져오기(option 2)
table2 = soup.find('table', {'border':'2'})
table2
<table border="2">
<caption> 옷 가격과 개수 </caption>
<tr>
<th> 상품 </th>
<th> 가격 </th>
<th> 개수 </th>
</tr>
<tr>
<td> 셔츠 </td>
<td> 30000원 </td>
<td> 2개 </td>
</tr>
<tr>
<td> 바지 </td>
<td> 20000원</td>
<td> 1개 </td>
</tr>
</table>
table2.find('caption')
<caption> 옷 가격과 개수 </caption>
table2.find_parent()
table2.find_previous().find_previous().find_previous()
<td> 5개 </td>
table2.find_previous_sibling()
<br/>
table2.find_previous_siblings()
[<br/>, <br/>, <table border="1">
 <caption> 과일 가격과 개수 </caption>
 <tr>
 <th> 상품 </th>
 <th> 가격 </th>
 <th> 개수 </th>
 </tr>
 <tr>
 <td> 오렌지 </td>
 <td> 100원 </td>
 <td> 10개 </td>
 </tr>
 <tr>
 <td> 사과 </td>
 <td> 150 </td>
 <td> 5개 </td>
 </tr>
 </table>]
실습 4
html_doc = '''
<!doctype html>
<html>
    <head>
        <title> 기초 스크레이핑 </title>
    </head>
    <body>
        <a href="http://www.naver.com", class='naver'>naver</a>
        <a href="http://www.google.com", class='google'>google</a>
        <a href="http://www.daum.net", class='daum'>daum</a>
    </body>
</html>
'''
# naver, goolg, daum 텍스트만 가져오기
soup = BeautifulSoup(html_doc, 'lxml')
a_s = soup.find_all('a')
for a in a_s:
  print(a.text)
naver
google
daum
[a.text for a in a_s]
['naver', 'google', 'daum']
# href 속성의 값(http:...) 가져오기
for a in a_s:
  print(a['href'])
http://www.naver.com
http://www.google.com
http://www.daum.net
[a['href'] for a in a_s]
['http://www.naver.com', 'http://www.google.com', 'http://www.daum.net']
for a in a_s:
  print(a.attrs) # a 태그의 속성 전체를 확인할 수 있음 (dictionary 타입의 결과)
{'href': 'http://www.naver.com', 'class': ['naver']}
{'href': 'http://www.google.com', 'class': ['google']}
{'href': 'http://www.daum.net', 'class': ['daum']}
for a in a_s:
  print(a.attrs['href']) # a 태그의 속성 전체가 dictionary 이므로 href로 색인해서 가져옴
http://www.naver.com
http://www.google.com
http://www.daum.net
Workshop 5
html_doc = '''
<html>
    <head>
        <meta charset = 'utf-8'>
        <title> 작품과 작가 모음</title>
    </head>
    <body>
        <h1> 책 정보 </h1>

        <p id='book1_title', class='book_title'>토지</p>
        <p id='author1', class='author'>박경리</p>

        <p id ='book2_title', class='book_title'>태백산맥</p>
        <p id ='author2', class='author'>조정래</p>

        <p id= 'book3_title', class='book_title'>감옥으로부터의 사색</p>
        <p id= 'author3', class='author'> 신영복</p>

    </body>
</html>
'''
soup = BeautifulSoup(html_doc, 'lxml')
soup.find('head')
<head>
<meta charset="utf-8"/>
<title> 작품과 작가 모음</title>
</head>
soup.head # soup.find('head')와 동일
<head>
<meta charset="utf-8"/>
<title> 작품과 작가 모음</title>
</head>
soup.body
<body>
<h1> 책 정보 </h1>
<p class="book_title" id="book1_title">토지</p>
<p class="author" id="author1">박경리</p>
<p class="book_title" id="book2_title">태백산맥</p>
<p class="author" id="author2">조정래</p>
<p class="book_title" id="book3_title">감옥으로부터의 사색</p>
<p class="author" id="author3"> 신영복</p>
</body>
soup.body.h1 # soup.find('body').find('h1')
<h1> 책 정보 </h1>
책제목/작가 형식으로 출력해보기
(예)
토지/박경리
태백산백/조정래
감옥으로부터의 사색/신영복
ps = soup.find_all('p')
for p in ps:
  print(p.text)
토지
박경리
태백산맥
조정래
감옥으로부터의 사색
 신영복
book_titles = soup.find_all('p', {'class' : 'book_title'})
authors = soup.find_all('p', {'class' : 'author'})
[<p class="author" id="author1">박경리</p>,
 <p class="author" id="author2">조정래</p>,
 <p class="author" id="author3"> 신영복</p>]
book_titles[0], authors[0]
(<p class="book_title" id="book1_title">토지</p>,
 <p class="author" id="author1">박경리</p>)
book_titles[1], authors[1]
(<p class="book_title" id="book2_title">태백산맥</p>,
 <p class="author" id="author2">조정래</p>)
book_titles[2], authors[2]
(<p class="book_title" id="book3_title">감옥으로부터의 사색</p>,
 <p class="author" id="author3"> 신영복</p>)
for book_title, author in zip(book_titles, authors):
  print(book_title.text, '/',author.text)
토지 / 박경리
태백산맥 / 조정래
감옥으로부터의 사색 /  신영복
select 사용하기
soup.find_all('p')
[<p class="book_title" id="book1_title">토지</p>,
 <p class="author" id="author1">박경리</p>,
 <p class="book_title" id="book2_title">태백산맥</p>,
 <p class="author" id="author2">조정래</p>,
 <p class="book_title" id="book3_title">감옥으로부터의 사색</p>,
 <p class="author" id="author3"> 신영복</p>]
soup.select('p') # soup.find_all('p') 과 동일한 결과
[<p class="book_title" id="book1_title">토지</p>,
 <p class="author" id="author1">박경리</p>,
 <p class="book_title" id="book2_title">태백산맥</p>,
 <p class="author" id="author2">조정래</p>,
 <p class="book_title" id="book3_title">감옥으로부터의 사색</p>,
 <p class="author" id="author3"> 신영복</p>]
soup.select('.book_title') # soup.find_all('p', {'class':'book_title'})
[<p class="book_title" id="book1_title">토지</p>,
 <p class="book_title" id="book2_title">태백산맥</p>,
 <p class="book_title" id="book3_title">감옥으로부터의 사색</p>]
soup.select('.author')
[<p class="author" id="author1">박경리</p>,
 <p class="author" id="author2">조정래</p>,
 <p class="author" id="author3"> 신영복</p>]
book_titles = soup.select('.book_title')
authors = soup.select('.author')

for book_title, author in zip(book_titles, authors):
  print(book_title.text, '/',author.text)
토지 / 박경리
태백산맥 / 조정래
감옥으로부터의 사색 /  신영복
soup.select('p.book_title') # p 태그 안에서의 class 속성이 book_title 인것만 가져오기
[<p class="book_title" id="book1_title">토지</p>,
 <p class="book_title" id="book2_title">태백산맥</p>,
 <p class="book_title" id="book3_title">감옥으로부터의 사색</p>]
soup.find('p')
<p class="book_title" id="book1_title">토지</p>
soup.select_one('p') # soup.find('p')와 동일한 결과
<p class="book_title" id="book1_title">토지</p>
soup.select('p')
[<p class="book_title" id="book1_title">토지</p>,
 <p class="author" id="author1">박경리</p>,
 <p class="book_title" id="book2_title">태백산맥</p>,
 <p class="author" id="author2">조정래</p>,
 <p class="book_title" id="book3_title">감옥으로부터의 사색</p>,
 <p class="author" id="author3"> 신영복</p>]
soup.select('body p') # body 태그의 자손인 p 태그
[<p class="book_title" id="book1_title">토지</p>,
 <p class="author" id="author1">박경리</p>,
 <p class="book_title" id="book2_title">태백산맥</p>,
 <p class="author" id="author2">조정래</p>,
 <p class="book_title" id="book3_title">감옥으로부터의 사색</p>,
 <p class="author" id="author3"> 신영복</p>]
# soup.select('body>p') # body 태그의 자식인 p 태그
# bs4 4.7 이상 지원
import bs4
bs4.__version__
'4.6.3'
soup.select('#book1_title') # id가 book1_title인 태그들을 가져옴
[<p class="book_title" id="book1_title">토지</p>]
soup.select('p#book1_title') # p 태그 중 id가 book1_title인 태그들을 가져옴
[<p class="book_title" id="book1_title">토지</p>]
Workshop 6
html_doc = """
<!doctype html>
<html>
 <head>
   <meta charset="utf-8">
   <title>사이트 모음</title>
 </head>
 <body>
   <p id="title"><b>자주 가는 사이트 모음</b></p>
   <p id="contents">이곳은 자주 가는 사이트를 모아둔 곳입니다.</p>
   <a href="http://www.naver.com" class="portal" id="naver">네이버</a> <br>
   <a href="https://www.google.com" class="search" id="google">구글</a> <br>
   <a href="http://www.daum.net" class="portal" id="daum">다음</a> <br>
   <a href="http://www.nl.go.kr" class="government" id="nl">국립중앙도서관</a>
 </body>
</html>
"""
select 문을 이용해서 아래와 같은 형식으로 출력하기
네이버 : http://www.naver.com
구글 : https://www.google.com
다음 : http://www.daum.net
국립중앙도서관 : http://www.nl.go.kr
soup = BeautifulSoup(html_doc, 'lxml')
a_s = soup.find_all('a')
for a in a_s:
  print(a.text, ':', a['href'])
네이버 : http://www.naver.com
구글 : https://www.google.com
다음 : http://www.daum.net
국립중앙도서관 : http://www.nl.go.kr
a_s = soup.select('a')
for a in a_s:
  print(a.text, ':', a['href'])
네이버 : http://www.naver.com
구글 : https://www.google.com
다음 : http://www.daum.net
국립중앙도서관 : http://www.nl.go.kr
a 태그의 class 속성이 portal인 텍스트만 출력하기
네이버
구글
p_s = soup.find_all('a', {'class': 'portal'})
for p in p_s:
  print(p.text)
네이버
다음
p_s = soup.select('a.portal')
for p in p_s:
  print(p.text)
네이버
다음
속성의 값 보기
soup.a
<a class="portal" href="http://www.naver.com" id="naver">네이버</a>
soup.a.attrs # 해당태그(a 태그)의 속성 전체를 확인할 수 있음
{'href': 'http://www.naver.com', 'class': ['portal'], 'id': 'naver'}
soup.a.attrs['href']
'http://www.naver.com'
soup.a.attrs['class']
['portal']
soup.a.attrs['id']
'naver'
soup.a['href'], soup.a['class'], soup.a['id']
('http://www.naver.com', ['portal'], 'naver')
댓글남기기